

Tips, Tricks & Techniques For Doing Latte Art At Home
Are you keen to learn how to create art with your lattes? Perhaps you have recently got a new coffee machine and you want to start pushing yourself and making beautiful coffee creations for your friends and family? Or maybe you have your eye on a position in a coffee house and want to improve your chances by learning how to do latte art so you can impress at the interview?
Regardless of your reasons, you can do it! It just takes a bit of time and practice.


How Long Does It Take To Learn To Do Latte Art?
Before you get too excited, note that while you can teach yourself latte art and become a master at pouring steamed milk, it is not something that you can simply learn overnight.
It takes quite a lot of practice - it's not like you can just read or watch the first tutorial and then get it straight away. Even once you do manage to create something that remotely resembles an image on the surface of your coffee, you'll then need to hone your craft and practice improving your latte art.
There will no doubt be lots of frustration along the way, but you'll get there with our helpful tips!
You see, just like most forms of art, latte art is all about getting familiar with your medium - in this case, steamed milk and an espresso shot of coffee, or espresso (we'll go into this in more detail but the best type of coffee is freshly ground whole beans). Add to that getting used to the tools and equipment you have - such as the cup, the jug and the steaming wand which froths the milk up to perfection, and so on.
You may want a direct answer about how quickly you can learn the skill, but the truth is there is no straightforward answer.
For example, if you teach yourself using tutorials and practice for 20 mins a day, then it could take you weeks to get it right but if you attend an intensive day course with a latte art professional then you'll likely come out of the session being able to produce something.
So, how do you actually create latte art?

Basic Latte Art Patterns
There are a few common patterns that you'll see again and again in advertising images and in coffee shops across the world, whether you opt for a latte or flat white coffee. However, remember that you will only get latte style art and can only create this pretty finish when having a milky coffee, as it's the milk meeting the coffee that makes the shapes which form the familiar images.
So check out these wonderfully easy tips on how to create latte art, all in less than 10 steps! Note that all mini-tutorials start at the point of pouring milk.
You can find out what tools and equipment you need for creating latte art here.
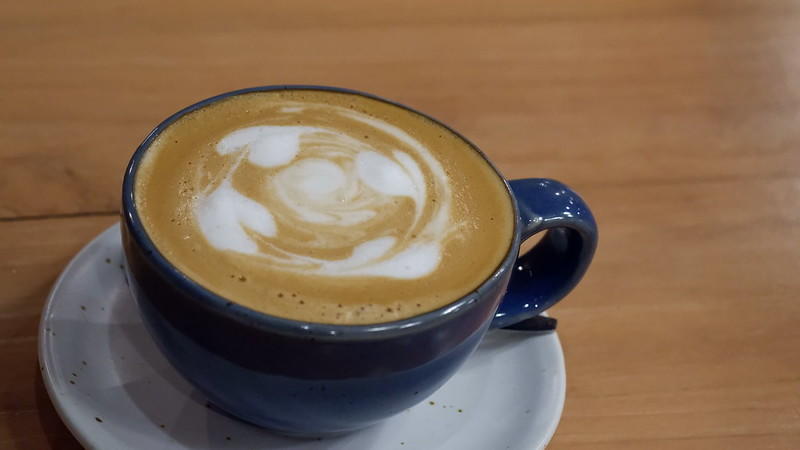
Rosetta
The Rosetta, which looks somewhat like a fern leaf, is one of the most common forms of latte art in the UK.
How to draw rosetta style latte art
- Step 1
Begin pouring from a decent height above the coffee and into the centre of the cup. Once you've half-filled the cup, drop the spout of your milk jug lower until it's as close to the surface as it can be and continue pouring steadily.
Start by pouring from a decent distance above the surface of the coffee right in the middle of the cup. The pour speed should be steady, not fast nor too slow. When the cup is around half full, take the spout and drop it in, getting as close to the surface of the coffee as you can.
- Step 2
With the spout still lowered, continue pouring into the middle of the cup and then gradually add a wiggle to your pouring action once the milk is almost gone.

- Step 3
When wiggling the remaining milk into the mixture, you'll see the layers start to develop and start to form the famous rosetta. Once you've filled up the surface with layers and the cup is almost full, then you need to back up the spout to the back of the cup.
- Step 4
As you back up the spout, raise it up slightly away from the coffee surface and then swipe it through the centre of your design to create that symmetrical rosetta image.
Tulip
The tulip is quite a self-explanatory title, with the pattern resembling the popular spring bloom.
How to draw tulip latte art
- Step 1
Fill up your jug with foamy milk, but pour away any excess bubbly foam so that you have a good amount of smooth milk. Tilt your cup slightly and then pour the milk thinly with the spout raised a few inches above your coffee cup in a circular motion into your espresso shot.
- Step 2
Lower your spout down so that the jug almost touches the coffee (as in the last tutorial), and keep pouring whilst gently shaking the jug until a crescent shape appears.
- Step 3
Make another half-moon shape with the spout close to the espresso once more, but this time push the coffee with your pouring milk into the direction of the moon portion that you made before.
- Step 4
You'll need to repeat this process a few more times to begin to stack up the petals of the tulip.
- Step 5
Once you've created your last set of petals, lift up your spout to make the milk pour out thinly once more and pour this through the crescent shapes to create the distinctive tulip shape.
Heart
Wouldn't you love to make a heart design for your friends or family?
How to draw heart latte art
- Step 1
Pour a decent-sized dollop of steamed milk into an espresso.
- Step 2
Swirl the coffee and the milk around in the cup to combine and create a nice golden brown colour, your backdrop or canvas.
- Step 3
Tilt the cup slightly and, with your other hand, hold the jug or pitcher around an inch above the surface of the coffee mixture and pour into the centre of the cup until you see a white circle.
- Step 4
Once your cup is around 3/4 full, raise your spout by another inch and pour the milk in a straight motion away from you, to create the bottom point of your heart.
Latte Art Cheats
Now, if you are all out of motivation (or simply all out of coffee), then don't waste any more of your precious time or beans on trying to master the perfect tulip, rosetta or heart design. Leave it to the experts to teach you and go and book a class!
In the meantime, though, let us let you in a little secret... there is a way to create impressive latte art that doesn't require any skill at all and still impress those you are preparing it for.
We have dug out a load of helpful tutorials to help you create latte art yourself!
Heart trail
Start off with your usual shot of espresso in a wide-rimmed cup or mug, plus your tapped, frothy, steamed milk.
How to create heart trail latte art
- Step 1
Tilt your coffee cup and pour your hot milk aginst the side of the cup, so that the milk doesn't break the toasted brown crema surface.
- Step 2
As you near the end of the milk portion, you'll notice that the milk starts to feel thicker and frothier. Once the milk being poured starts to appear thick and white on the surface, begin to pour a series of drips in a circular motion (as close as possible in size), a bit like a dot to dot picture of a snail's shell.
- Step 3
Using a clean cocktail stick and starting with one of the outer circles, submerge the stick and drag it through the string of milk circles and watch as you create a swirly pattern of small hearts!
It's a thing of beauty and everyone will love it!
Summarise with AI:
Did you like this article? Leave a rating!

